SEC536: Adversarial AI - Penetration Testing AI Systems
SEC536Offensive Operations, Artificial Intelligence

BloodHound is as a tool allowing for the analysis of AD rights and relations, focusing on the ones that an attacker may abuse.

Active Directory (AD) is a vital part of many IT environments out there. It allows IT departments to deploy, manage and remove their workstations, servers, users, user groups etc. in a structured way. But ‘structured’ does not always mean ‘clear’. Privilege creep, whereby a user collects more and more user rights throughout time (or as they change positions in an organization), is a dangerous issue. The wide range of AD configurations also allow IT administrators to configure a number of unsafe options, potentially opening the door for attackers to sneak through.
For Red Teamers having obtained a foothold into a customer’s network, AD can be a real treasure trove. You may find paths to Domain Administrator, gain access and control over crucial resources, and discern paths for lateral movement towards parts of the environment that are less heavily monitored than the workstation that served as the likely initial access point. A pentester discovering a Windows Domain during post-exploitation, which will be the case in many Red Team exercises, will need to assess the AD environment for any weaknesses.
For Engineers, auditing AD environments is vital to make sure attackers will not find paths to higher privileges or lateral movement inside the AD configuration.
That’s where BloodHound comes in, as a tool allowing for the analysis of AD rights and relations, focusing on the ones that an attacker may abuse. After collecting AD data using one of the available ingestors, BloodHound will map out AD objects (users, groups, computers, …) and accesses and query these relationships in order to discern those that may lead to privilege escalation, lateral movement, etc.
In this blog post, we will be discussing:
We will be looking at user privileges, local admin rights, active sessions, group memberships etc. A basic understanding of AD is required, though not much.
BloodHound can be installed on Windows, Linux or macOS. Although all these options are valid, for the purpose of this article we will be using Ubuntu Linux. An extensive manual for installation is available. There’s not much we can add to that manual, just walk through the steps one by one. You can stop after the “Download the BLoodHound GUI” step, unless you would like to build the program yourself.
For the purpose of this blog post, I used an Ubuntu Linux VM, but BloodHound will run just as well on other OS’es.
The installation manual will have taken you through an installation of Neo4j, the database hosting the BloodHound datasets. Before running BloodHound, we have to start that Neo4j database.
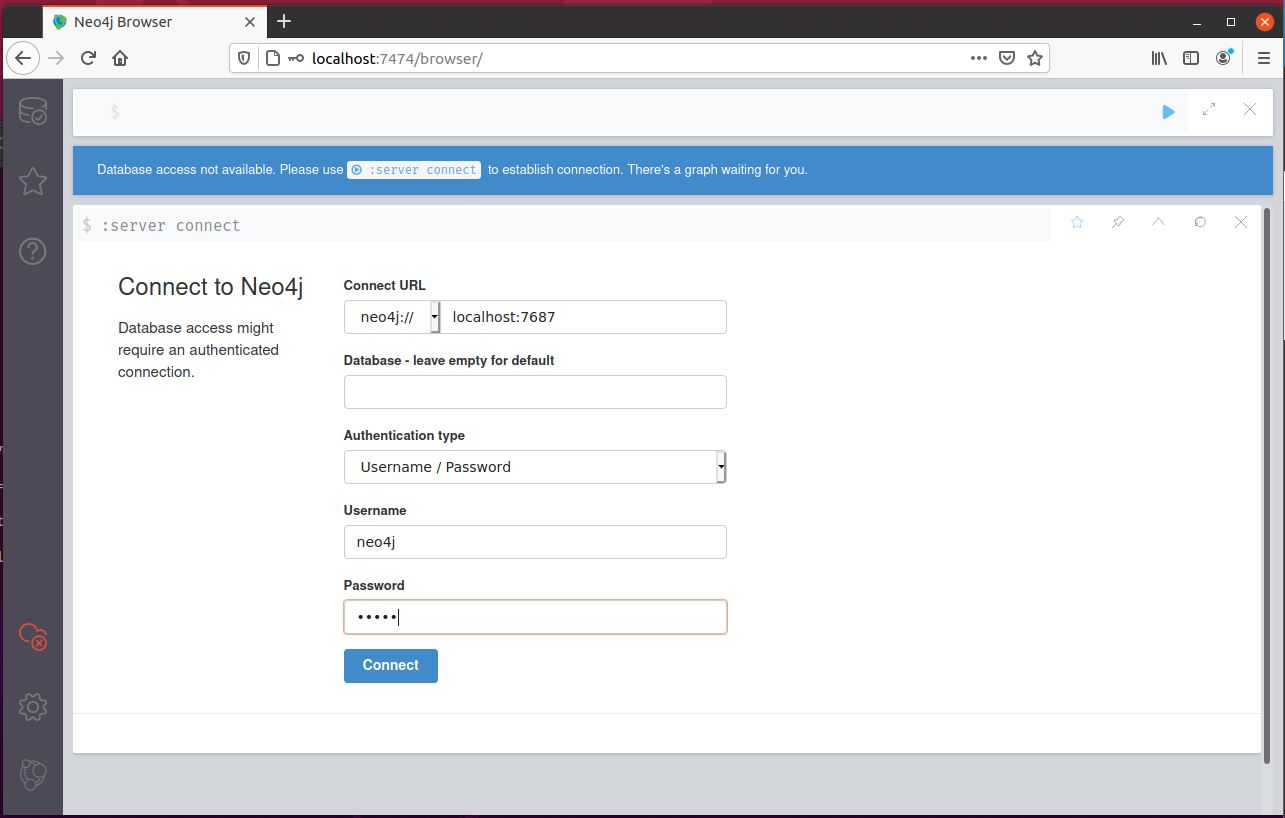
sudo neo4j startAfter the database has been started, we need to set its login and password. Open a browser and surf to https://localhost:7474. You will get a page that looks like the one in image 1. Log in with the default username neo4j and password neo4j. You will be prompted to change the password. By default, the Neo4j database is only available to localhost. Although you can run Neo4j and BloodHound on different machines with some more setup, it’s easiest to just run both on the same machine.
Now we’ll start BloodHound. Navigate on a command line to the folder where you downloaded BloodHound and run the binary inside it by issuing the command:
./BloodHoundAn interface such as the one below will pop up. If you don’t get a green checkmark next to the bolt:// url, your database is likely not yet running (mind you it can take a minute after issuing the start command for the DB to be up and running). Log in with your newly chosen Neo4j credentials.
By default, the BloodHound database does not contain any data. We have a couple of options to collect AD data from our target environment. One way is to download the Visual Studio project for SharpHound3 from GitHub (see references), compile SharpHound3 and run that binary from an AD-connected foothold inside the victim network.
Alternatively, the BloodHound repository on GitHub contains a compiled version of SharpHound in the Collectors folder. You have the choice between an EXE or a PS1 file. AzureHound.ps1 will collect useful information from Azure environments, such as automation accounts, device etc. For the purpose of this blogpost, we will focus on SharpHound and the data it collects.
I prefer to compile tools I use in client environments myself. It may be a bit paranoia, as BloodHound maintains a reliable GitHub with clean builds of their tools. Nonetheless, I think it is a healthy attitude to have a natural distrust of anything executable. In the end, I am responsible for what I do in my client’s environment, and double caution is not a luxury in that regard.
When choosing a collection tool, keep in mind that different versions of BloodHound match with different collection tool versions. It is easiest to just take the latest version of both, but be mindful that a collection with an old version of SharpHound may not be loaded in a newer version of BloodHound and vice versa.
On the first page of our BloodHound Cheat Sheet we find a recap of common SharpHound options. This allows you to tweak the collection to only focus on what you think you will need for your assessment. Some considerations are necessary here. The more data you hoover up, the more noise you will make inside the network. On the other hand, we must remember that we are in the post-exploitation phase of our Red Team exercise. Any minute now, the Blue Team may come barging through the door and clean up our foothold(s) and any persistence we gained. In other words, we may not get a second shot at collecting AD data. This is going to be a balancing act.
We’ll now start building the SharpHound command we will issue on the Domain joined system that we just conquered. Remember you can upload the EXE or PS1 and run it, use PowerShell alternatives such as PowerPick to run the PS1, or use a post-exploitation framework command such as execute-assembly (Cobalt Strike) or C# assembly (Covenant) to run the EXE. OpSec-wise, these alternatives will generally lead to a smaller footprint.
First, we choose our Collection Method with –CollectionMethod. Depending on your assignment, you may be constrained by what data you will be assessing. Whenever in doubt, it is best to just go for “All” and then sift through it later on. In Red Team assignments, you may always lose your initial foothold, and thus the possibility to collect more data, even with persistence established (after all, the Blue Team may be after you!). Best to collect enough data at the first possible opportunity.
The second option will be the domain name with `--d`. You only need to specify this if you don’t want SharpHound to query the domain that your foothold is connected to.
The `--Stealth` options will make SharpHound run single-threaded. This will take more time, but EDR or monitoring solutions may catch your collection more quickly if you run multi-threaded. Again, an OpSec consideration to make. If you’re an Engineer using BloodHound to assess your own environment, you won’t need to worry about such issues.
`--ExcludeDomainControllers` will leave you without data from the DCOnly collection method, but will also be less noisy towards EDR solutions running on the DC systems. OpSec-wise, this is one of those cases where you may want to come back for a second round of data collection, should you need it.
`--ComputerFile` allows you to provide a list of computers to collect data from, line-separated. This allows you to target your collection.
`--Throttle` and `--Jitter` options will introduce some OpSec-friendly delay between requests (Throttle), and a percentage of Jitter on the Throttle value. Your chances of being detected will be decreasing, but your mileage may vary.
SharpHound will run for anywhere between a couple of seconds in a relatively small environment, up to tens of minutes in larger environments (or with large Stealth or Throttle values). When SharpHound is done, it will create a Zip file named something like 20210612134611_BloodHound.zip inside the current directory. That Zip loads directly into BloodHound.
For the purpose of this blogpost, I will be generating a test DB using the DBCreator tool from the BloodHound Tools repository (see references). This Python tool will connect to your Neo4j database and generate data that corresponds to AD objects and relations. This allows you to try out queries and get familiar with BloodHound. If you have authorization to collect AD data in your professional environment or a lab, that will of course be a good training ground too. Just make sure you get that authorization though.
If you use DBCreator.py like I did, you may get a syntax error regarding curly brackets. This is due to a syntax deprecation in a connector. If you go to my GitHub, you will find a version that is patched for this issue (https://github.com/michiellemmens/DBCreator)
We’ll start by running BloodHound. Navigate to the folder where you installed it and run
./BloodHoundThe first time you run this command, you will need to enter your Neo4j credentials that you chose during its installation. You may get an error saying “No database found”.
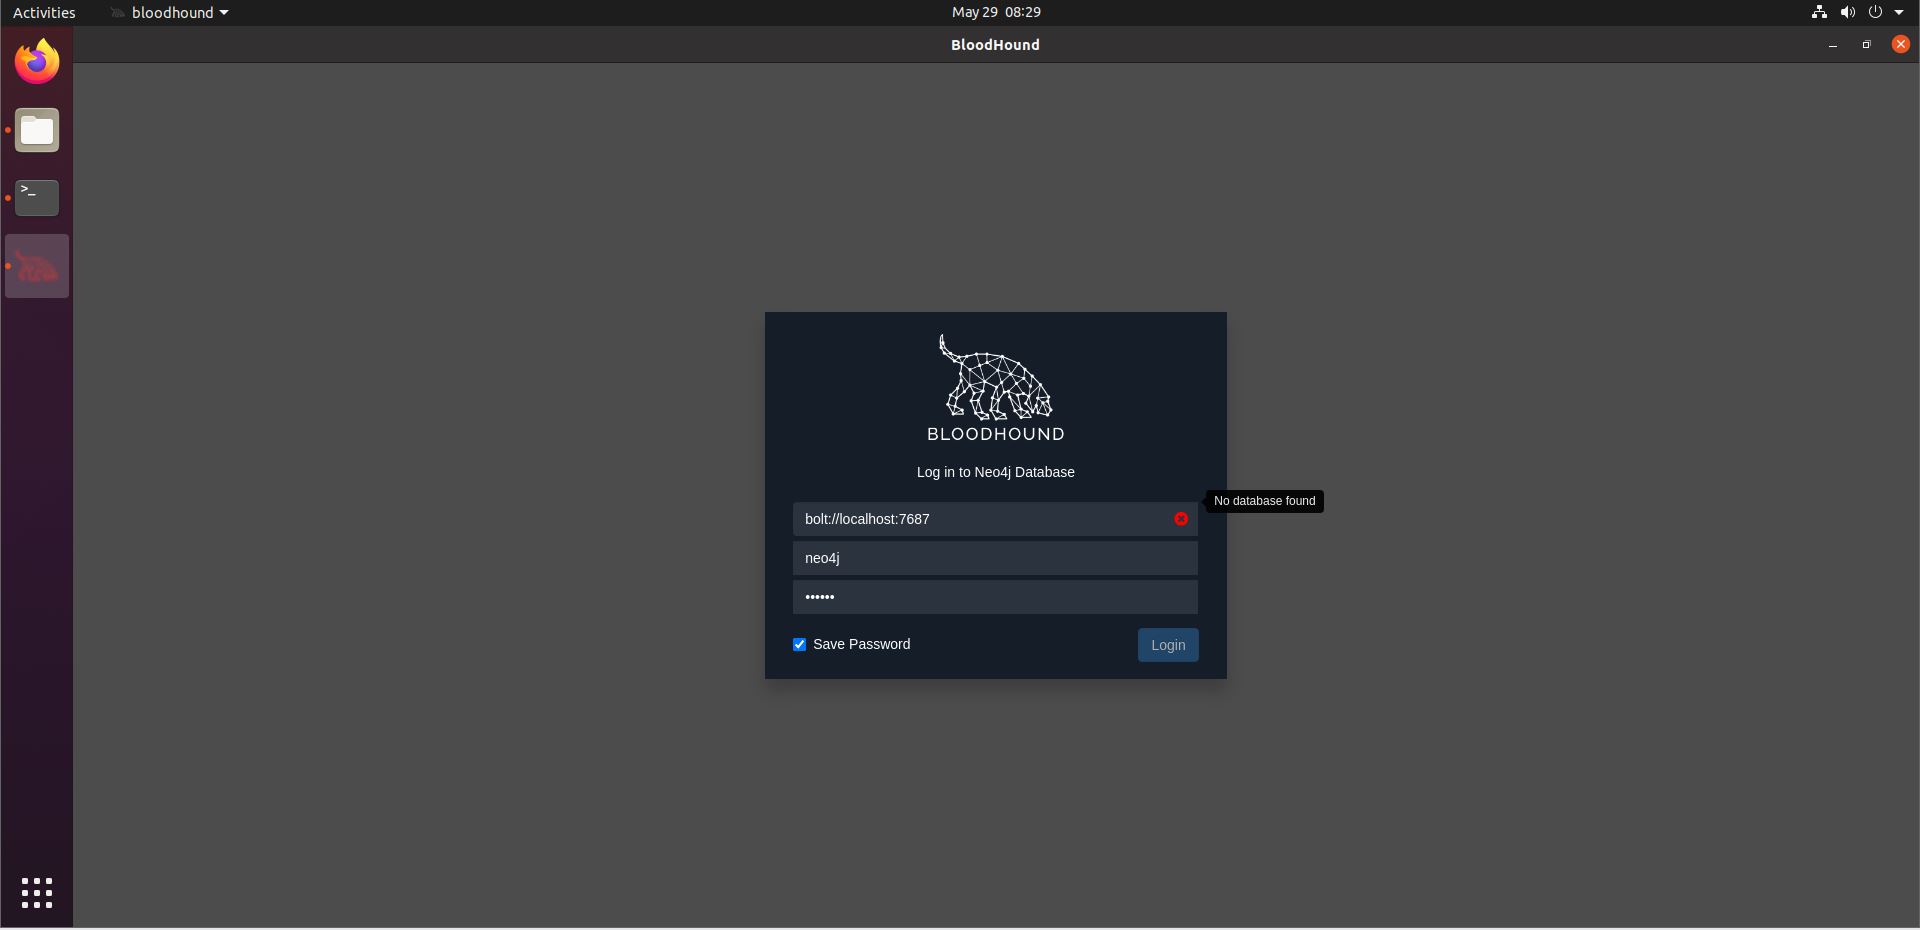
If this happens, open a terminal and run
sudo neo4j startThen reopen BloodHound.
If you collected your data using SharpHound or another tool, drag-and-drop the resulting Zip file onto the BloodHound interface. This will load in the data, processing the different JSON files inside the Zip. Import may take a while.
When the import is ready, our interface consists of a number of items.
On the right, we have a bar with a number of buttons for refreshing the interface, exporting and importing data, change settings etc. Click on the Settings button (the 3 gears button, second to last on the right bar) and activate the Query Debug Mode. This will help you later on by displaying the queries for the internal analysis commands in the Raw Query field on the bottom.
On the bottom right, we can zoom in and out and return home, quite self-explanatory.
The fun begins on the top left toolbar. Let’s take those icons from right to left. The rightmost button opens a menu that allows us to filter out certain data that we don’t find interesting. To the left of it, we find the Back button, which also is self-explanatory.
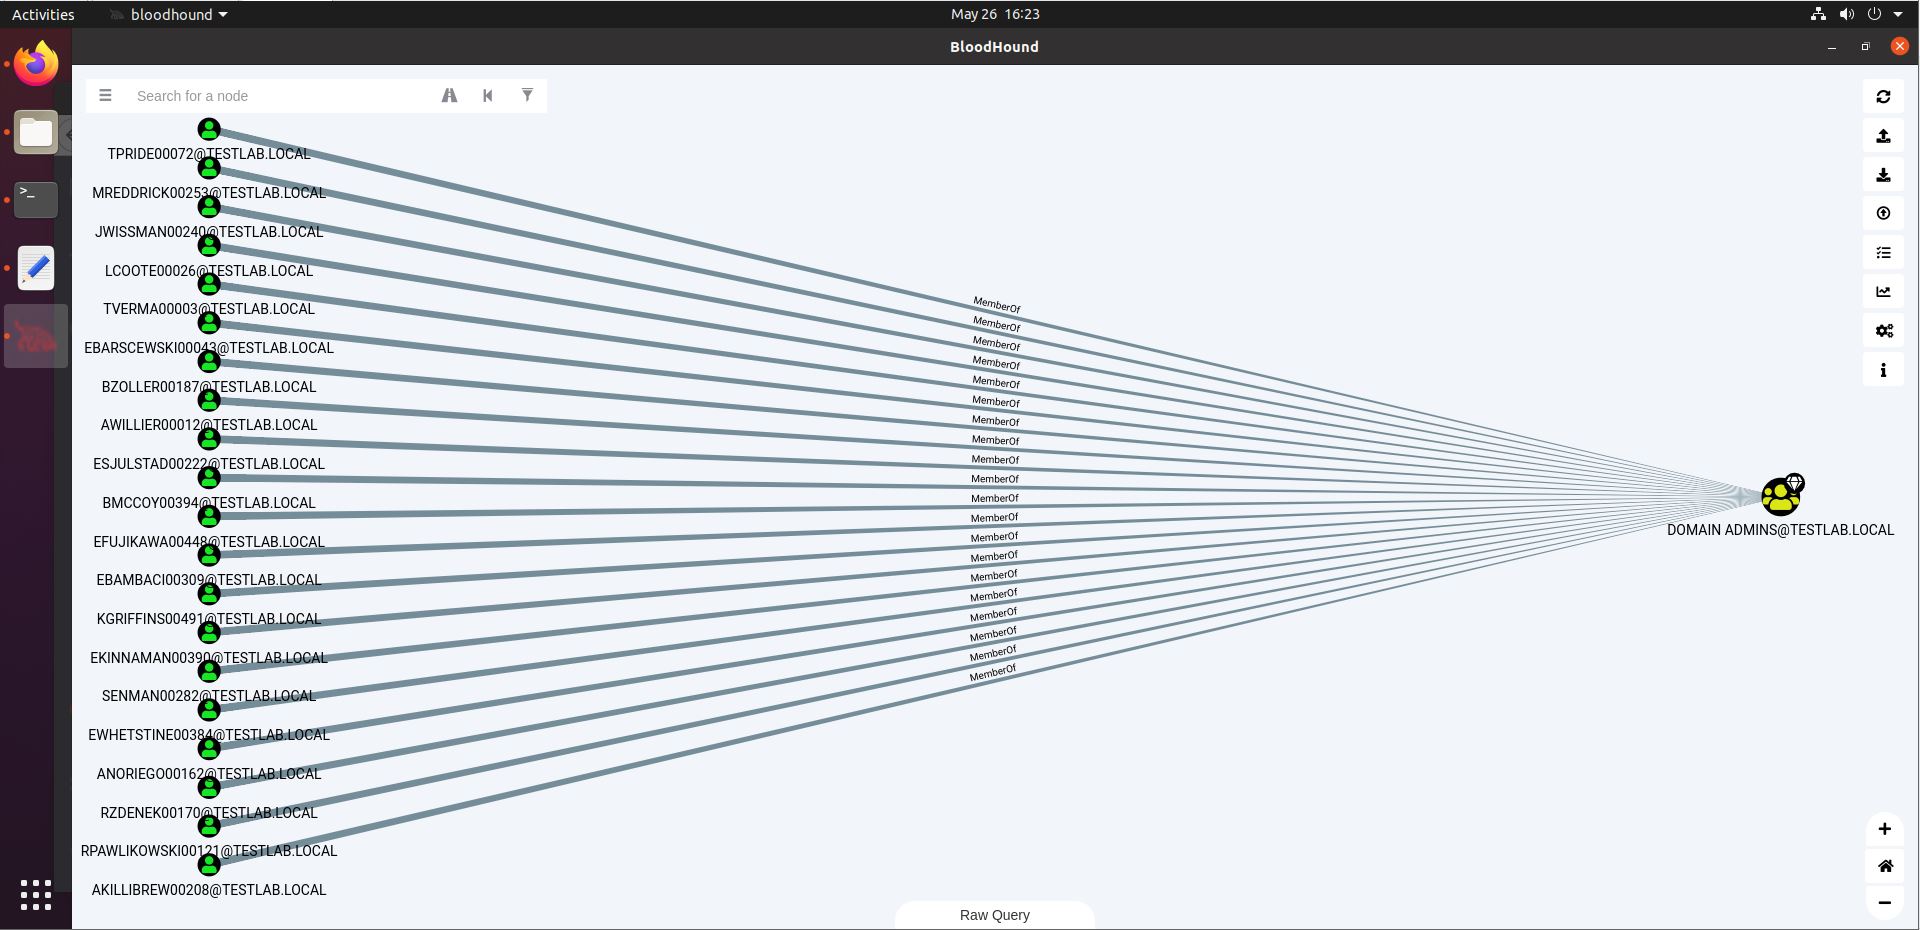
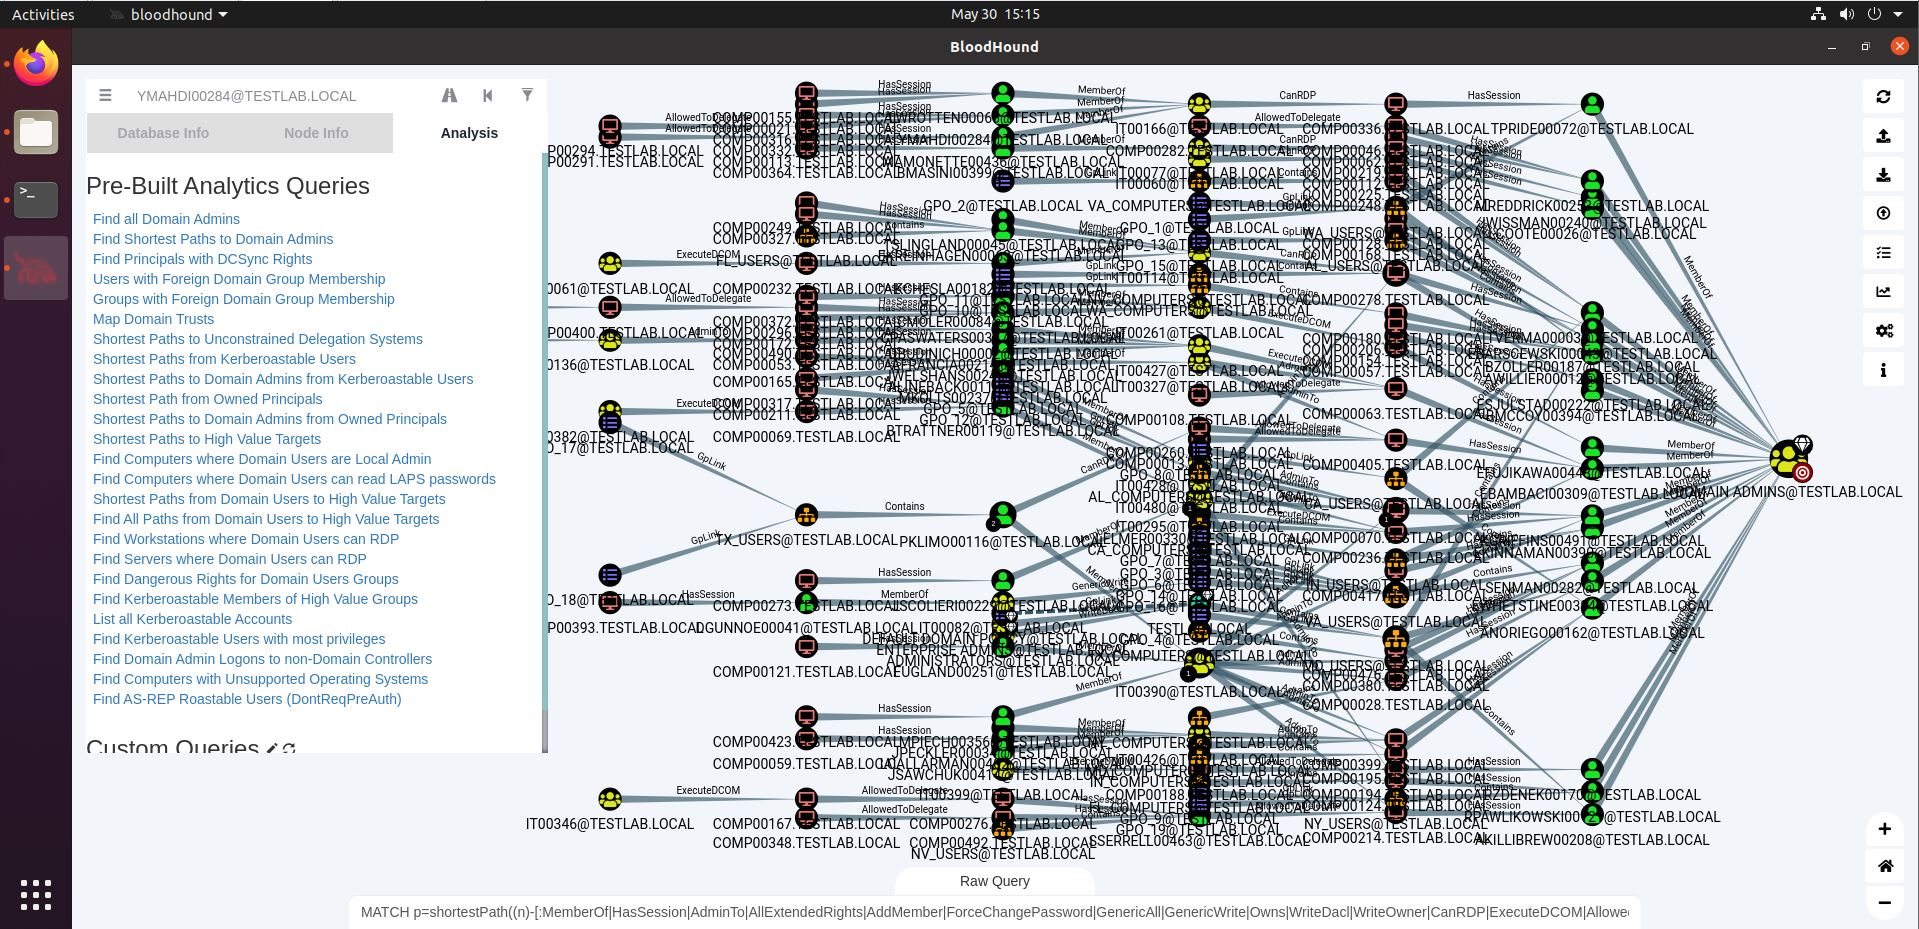
The third button from the right is the Pathfinding button (highway icon). A second textbox will open, allowing us to enter a source (the top textbox) and a destination (the newly opened bottom one), and find a path between these two nodes. In the screenshot below, you see me displaying the path from a domain user (YMAHDI00284) and the Domain Admins group. We’ll analyze this path in depth later on.
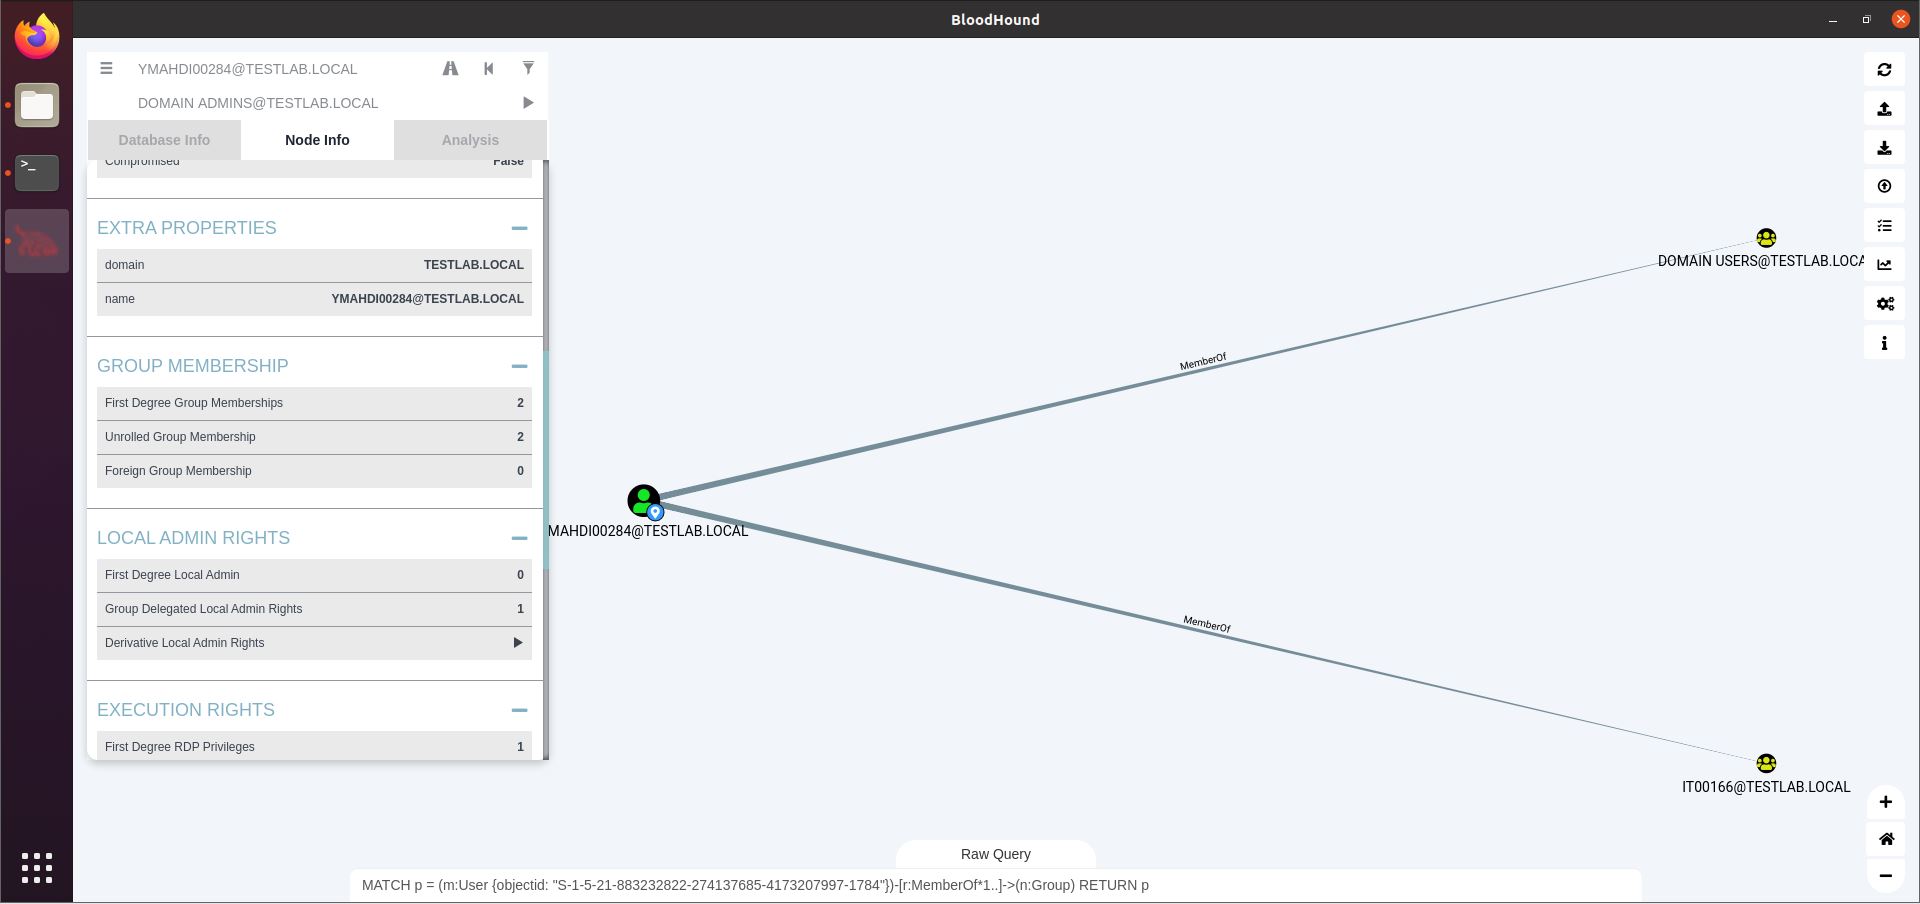
On the top left, we have a ‘hamburger’ icon. Clicking it, a context menu with 3 tabs opens: Database Info, displaying statistics about the database (and some DB management options at the bottom), Node Info displaying information on the currently selected node, and the Analysis button leading to built-in queries.
The Node Info field (see screenshot below) shows you information on the selected node, as well as relationships this node has with other nodes, such as group memberships or sessions on computers. Our user YMAHDI00284 has 2 sessions, and is a member of 2 AD groups. Clicking one of the options under Group Membership will display those memberships in the graph.
The Analysis tab holds a lot of pre-built queries that you may find handy. The second one, for instance, will “Find the Shortest Path to Domain Admins”. This can generate a lot of data, and it should be read as a source-to-destination map. If you can obtain any of the necessary rights on a source node (such as the YMAHDI00284 user in the example above), you can walk the path towards Domain Admin status (given that the steps along the way indeed fulfil their promise – more on that later).
“Shortest Path to Domain Admins from Kerberoastable Users” will find a path between any Kerberoastable user and Domain Admin. As we can see in the screenshot below, our demo dataset contains quite a lot. Interestingly, on the right hand side, we see there are some Domain Admins that are Kerberoastable themselves, leading to direct DA status.
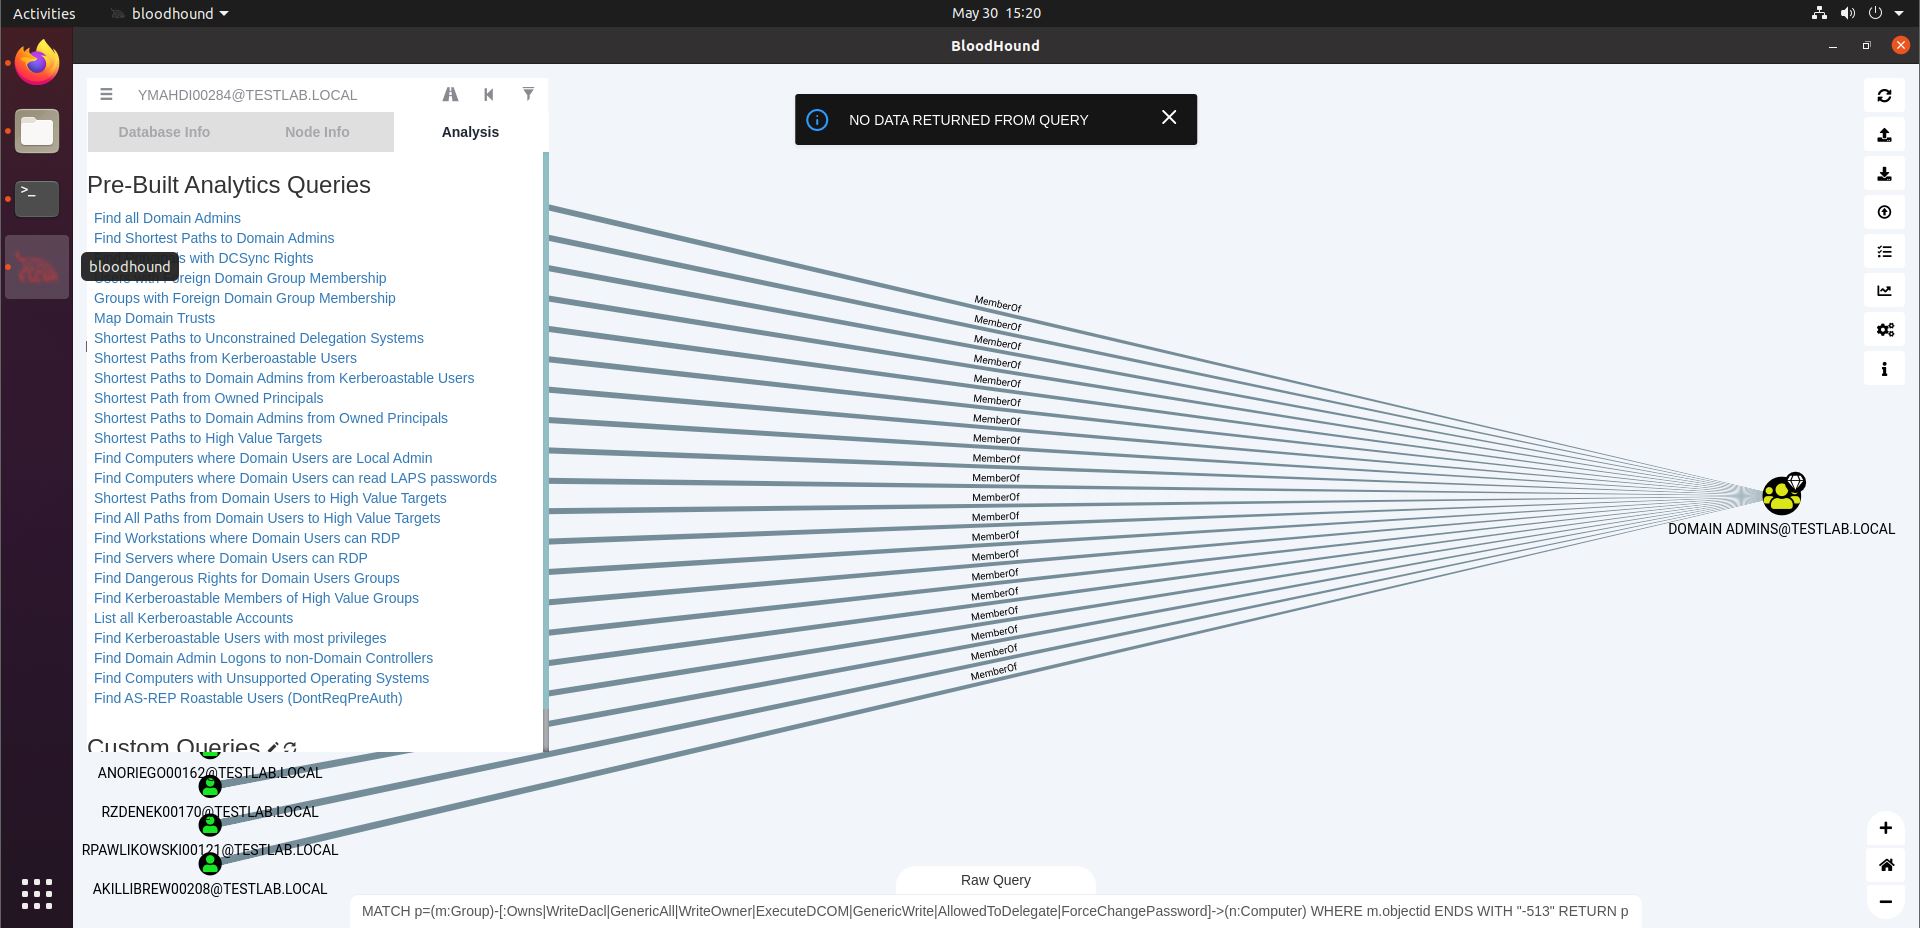
The “Find Dangerous Rights for Domain Users Groups” query will look for rights that the Domain Users group may have such as GenericAll, WriteOwner, GenericWrite, Owns, on computer systems. These rights would allow wide access to these systems to any Domain User, which is likely the status that your freshly phished foothold machine user has. On the screenshot below, we see that a notification is put on our screen saying “No data returned from query”. Don’t get confused by the graph showing results of a previous query, especially as the notification will disappear after a couple of seconds.
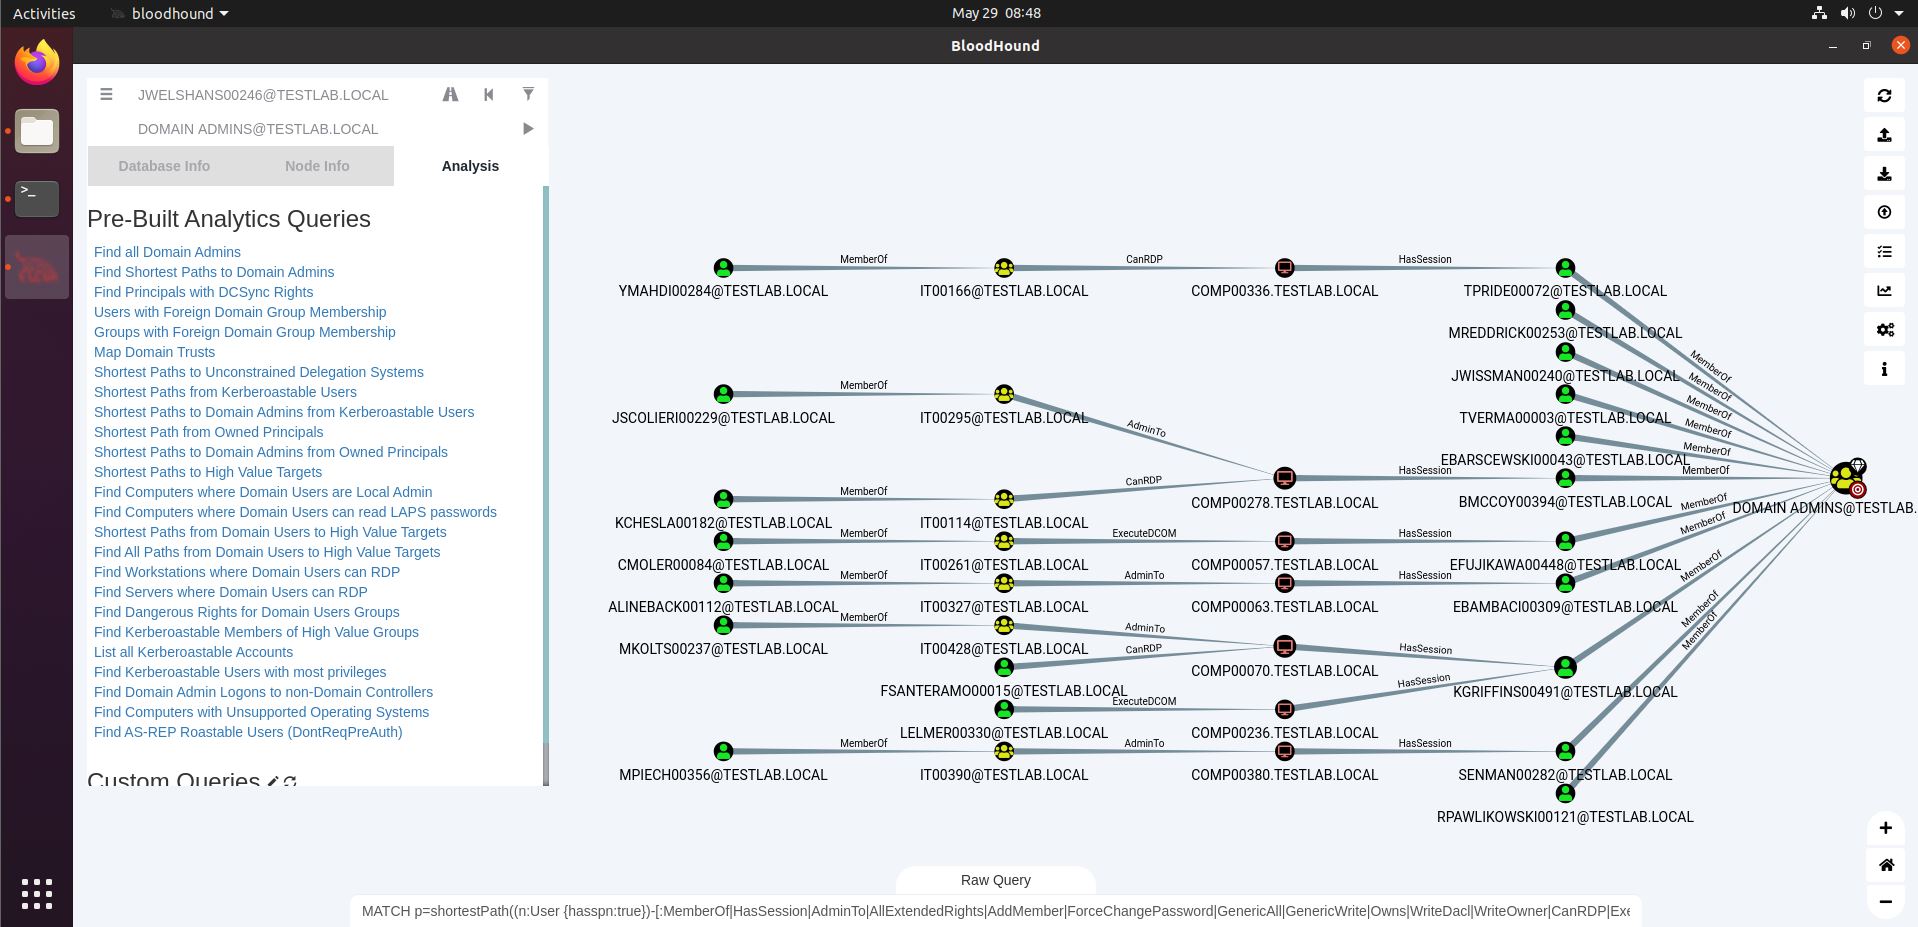
Let’s circle back to our initial pathfinding from the YMAHDI00284 user to Domain Admin status. Say you found credentials for YMAHDI00284 on a share, or in a password leak, or you cracked their password through Kerberoasting. How would access to this user’s credentials lead to Domain Admin? Here’s the screenshot again.

So to exploit this path, we would need to RDP to COMP00336, and either dump the credentials there (for which we need high integrity access), or inject shellcode into a process running under the TPRIDE00072 user. This will then give us access to that user’s token.
However, as we said above, these paths don’t always fulfil their promise. The example above demonstrates just that: TPRIDE00072 has a session on COMP00336 at the time of data collection with SharpHound. These sessions are not eternal, as users may log off again. By the time you try exploiting this path, the session may be long gone. What can we do about that?
Well, there are a couple of options. Firstly, you could run a new SharpHound collection with the following command:
SharpHound.exe –CollectionMethod Sessions –Loop –Loopduration 02:00:00This will collect the session data from all computers for a period of 2 hours. A number of collection rounds will take place, and the results will be Zipped together (a Zip full of Zips). This data can then be loaded into BloodHound (mind you, you need to unzip the ‘MotherZip’ and drag-and-drop-load the ‘ChildZips’, which you can do in bulk). This gives you an update on the session data, and may help abuse sessions on our way to DA.
Another way of circumventing this issue is not relying on sessions for your path to DA. By simply filtering out those edges, you get a whole different “Find Shortest Path to Domain Admins” graph.
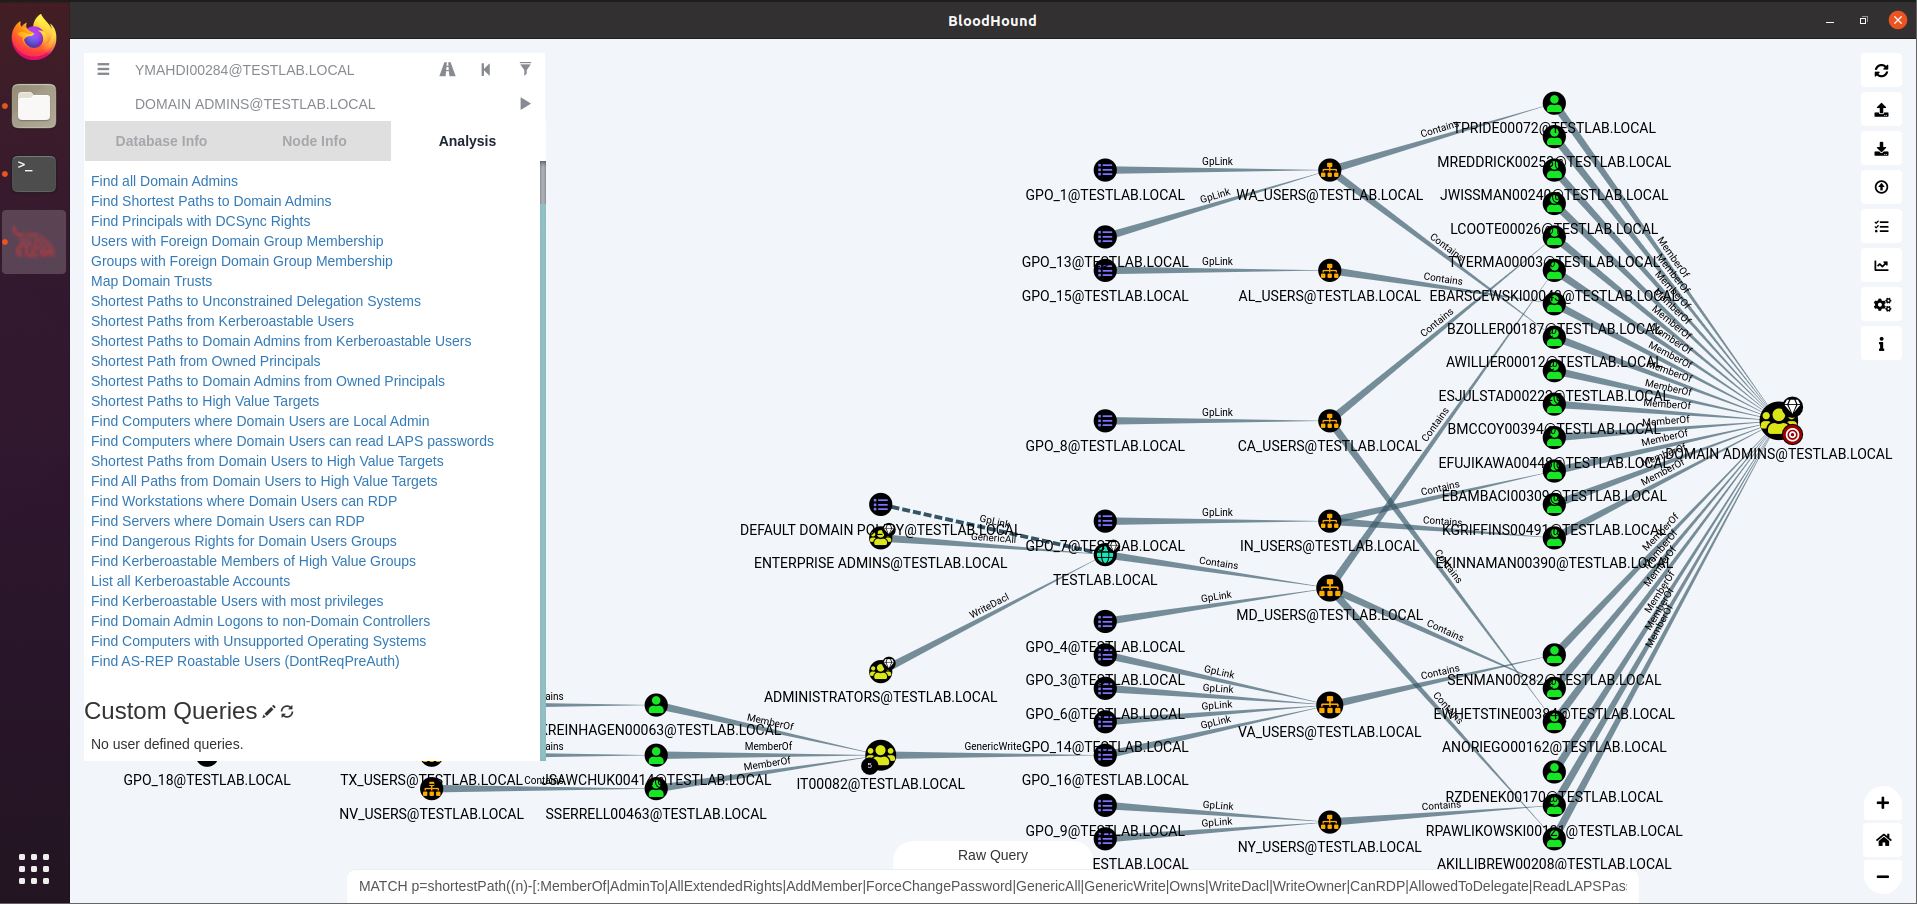
On the bottom left, we see that EKREINHAGEN00063 (and 2 other users) is member of a group (IT00082) that can write to GPO_16, applicable to the VA_USERS Group containing SENMAN00282, who in turn is a DA.
So if you can compromise EKREINHAGEN00063, you could write to that GPO_16 and add a scheduled task or startup script to run your payload. Whenever SENMAN00282 logs in, you will get code execution as a Domain Admin account.
However, filtering out sessions means leaving a lot of potential paths to DA on the table. It is best not to exclude them unless there are good reasons to do so. Sessions can be a true treasure trove in lateral movement and privilege escalation.
Whenever analyzing such paths, it’s good to refer to BloodHound documentation to fully grasp what certain edges (relationships) exactly mean and how they help you in obtaining your goal (higher privileges, lateral movement, …), and what their OpSec considerations are. In the last example, a GenericWrite on a high-privileged group allows you to add users to it, but this may well trigger some alerts. As always in Red Teaming, it is important to be aware of the potential footprint of your actions and weigh them against the benefit you stand to gain.
The BloodHound interface is fantastic at displaying data and providing with pre-built queries that you will need often on your path to conquering a Windows Domain. At some point, however, you may find that you need data that likely is in the database, but there’s no pre-built query providing you with the answer. Or you want to run a query that would take a long time to visualize (for example with a lot of nodes). Or you want a list of object names in columns, rather than a graph or exported JSON. Whatever the reason, you may feel the need at some point to start getting command-line-y. This is where your direct access to Neo4j comes in.
Remember how we set our Neo4j password through the web interface at localhost:7474? That interface also allows us to run queries. Let’s try one that is also in the BloodHound interface: List All Kerberoastable Accounts. In the screenshot below, we see the query being used at the bottom (MATCH (n:User)…). That is because we set the Query Debug Mode (see earlier). We can simply copy that query to the Neo4j web interface.
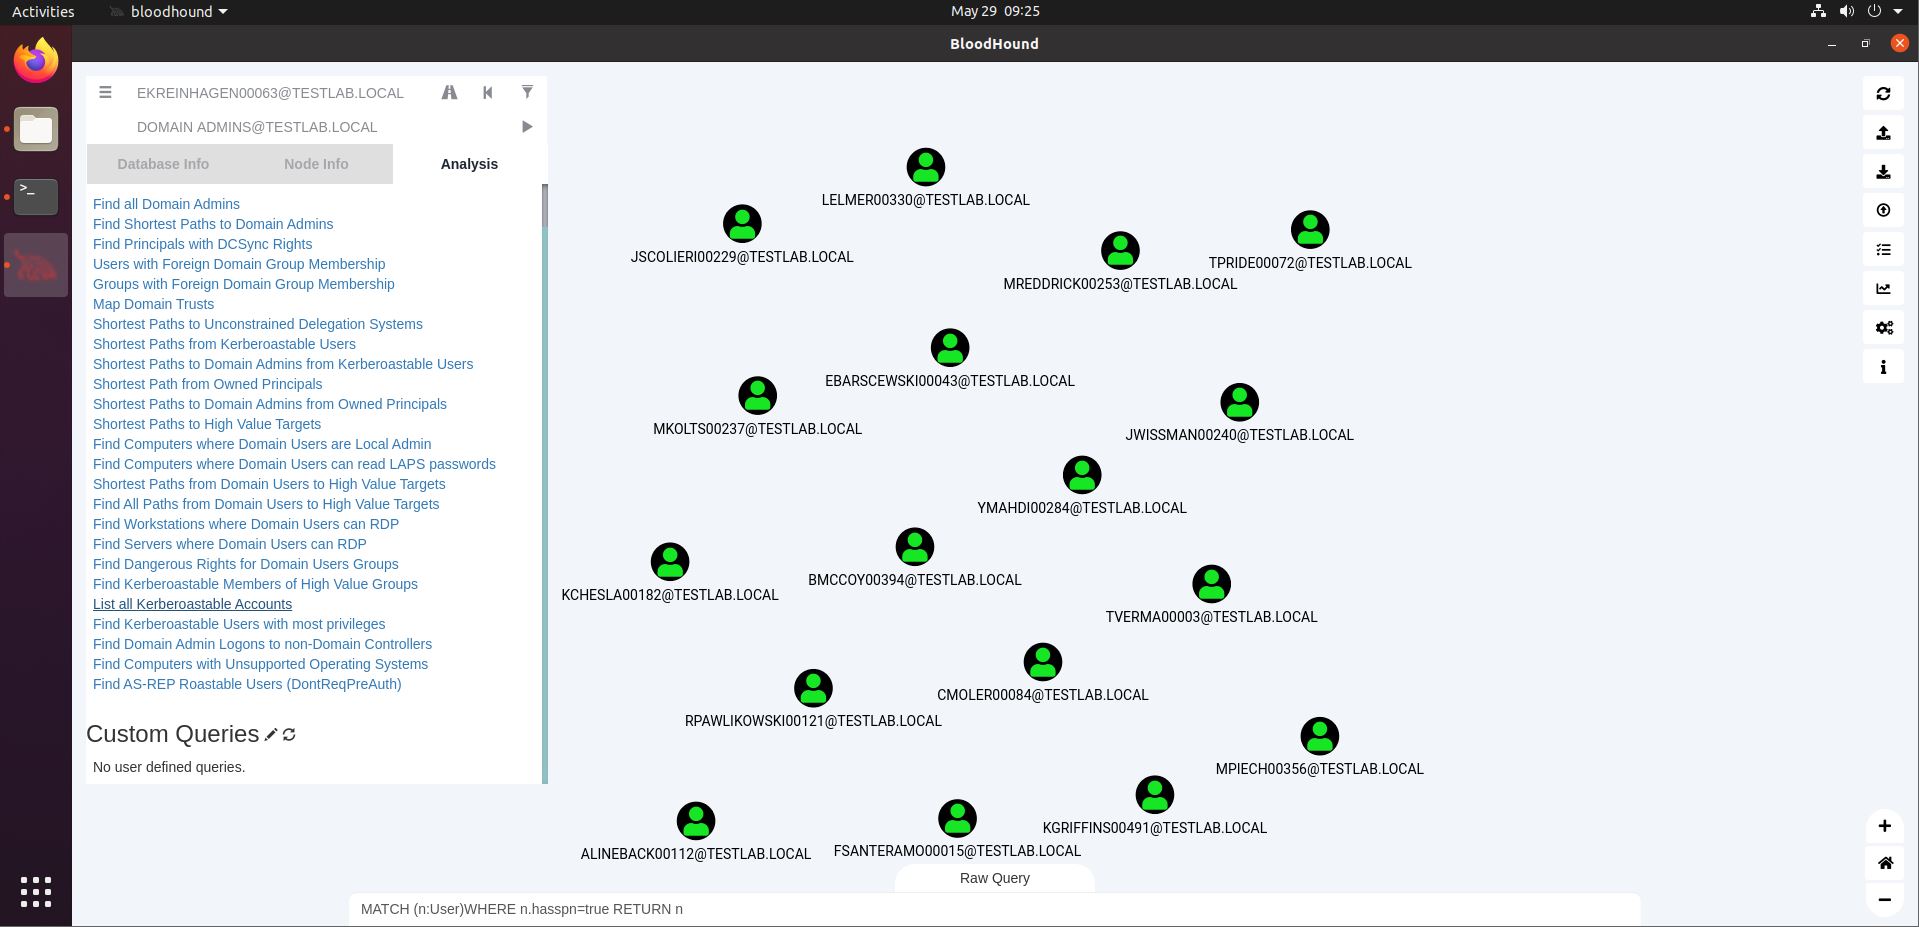
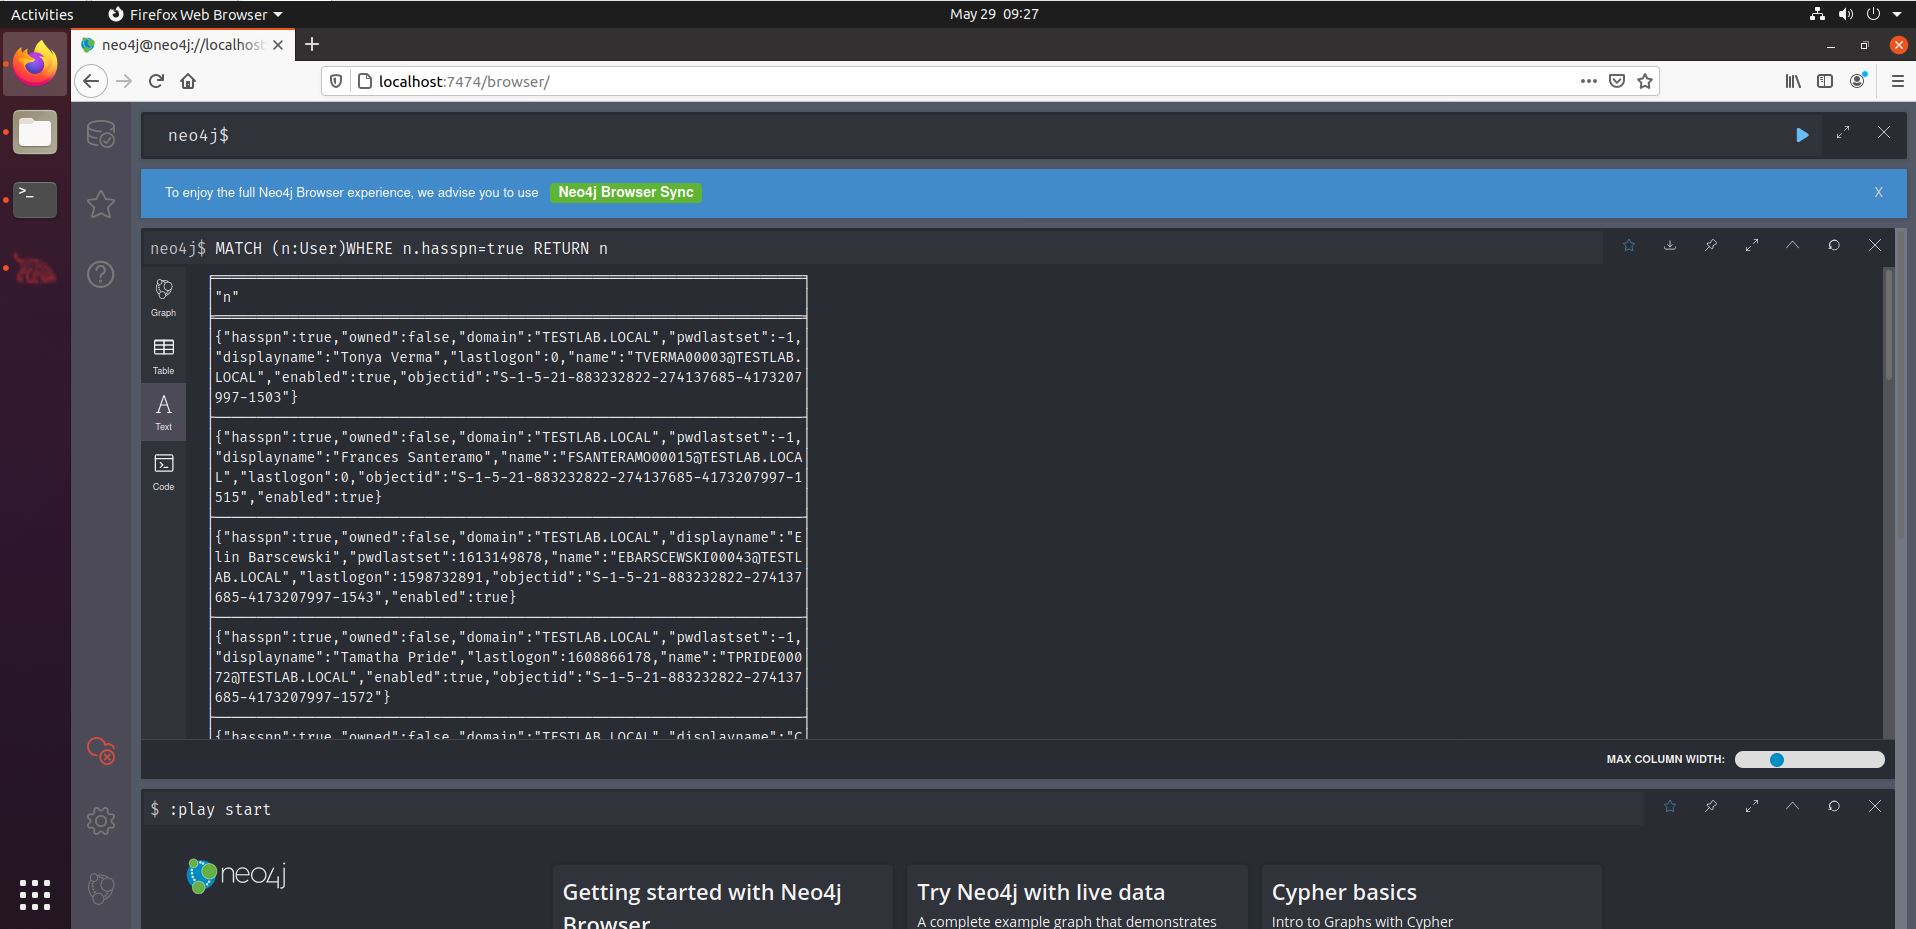
In the screenshot above, we see that the entire User object (n) is being returned, showing a lot of information that we may not need. After all, we’re likely going to collect Kerberos tickets later on, for which we only need the usernames for the Kerberoastable users. We can thus easily adapt the query by appending “.name” after the final “n”, showing only the usernames. By the way, the default output for “n” will be Graph, but we can choose Text to match the output above.
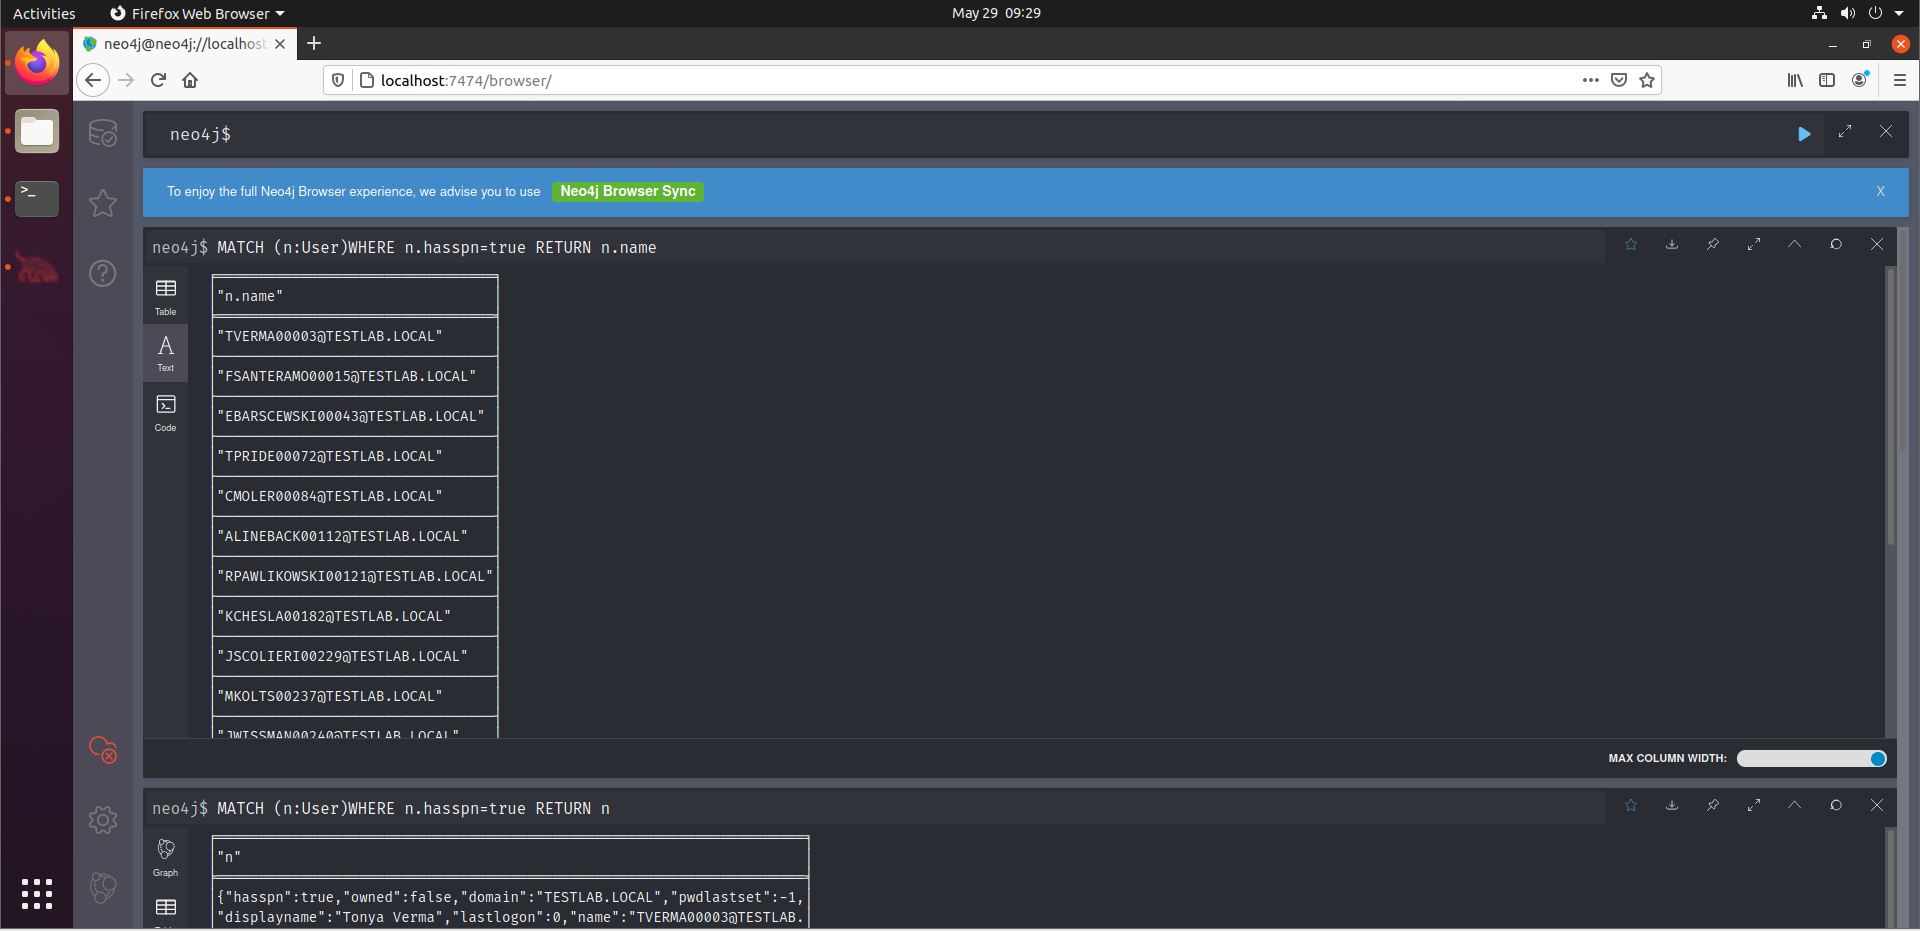
We see the query uses a specific syntax: we start with the keyword “MATCH”. A letter is chosen that will serve as shorthand for the AD User object, in this case “n”. For Kerberoastable users, we need to display user accounts that have a Service Principle Name (SPN). Finally, we return n (so the user) ‘s name.
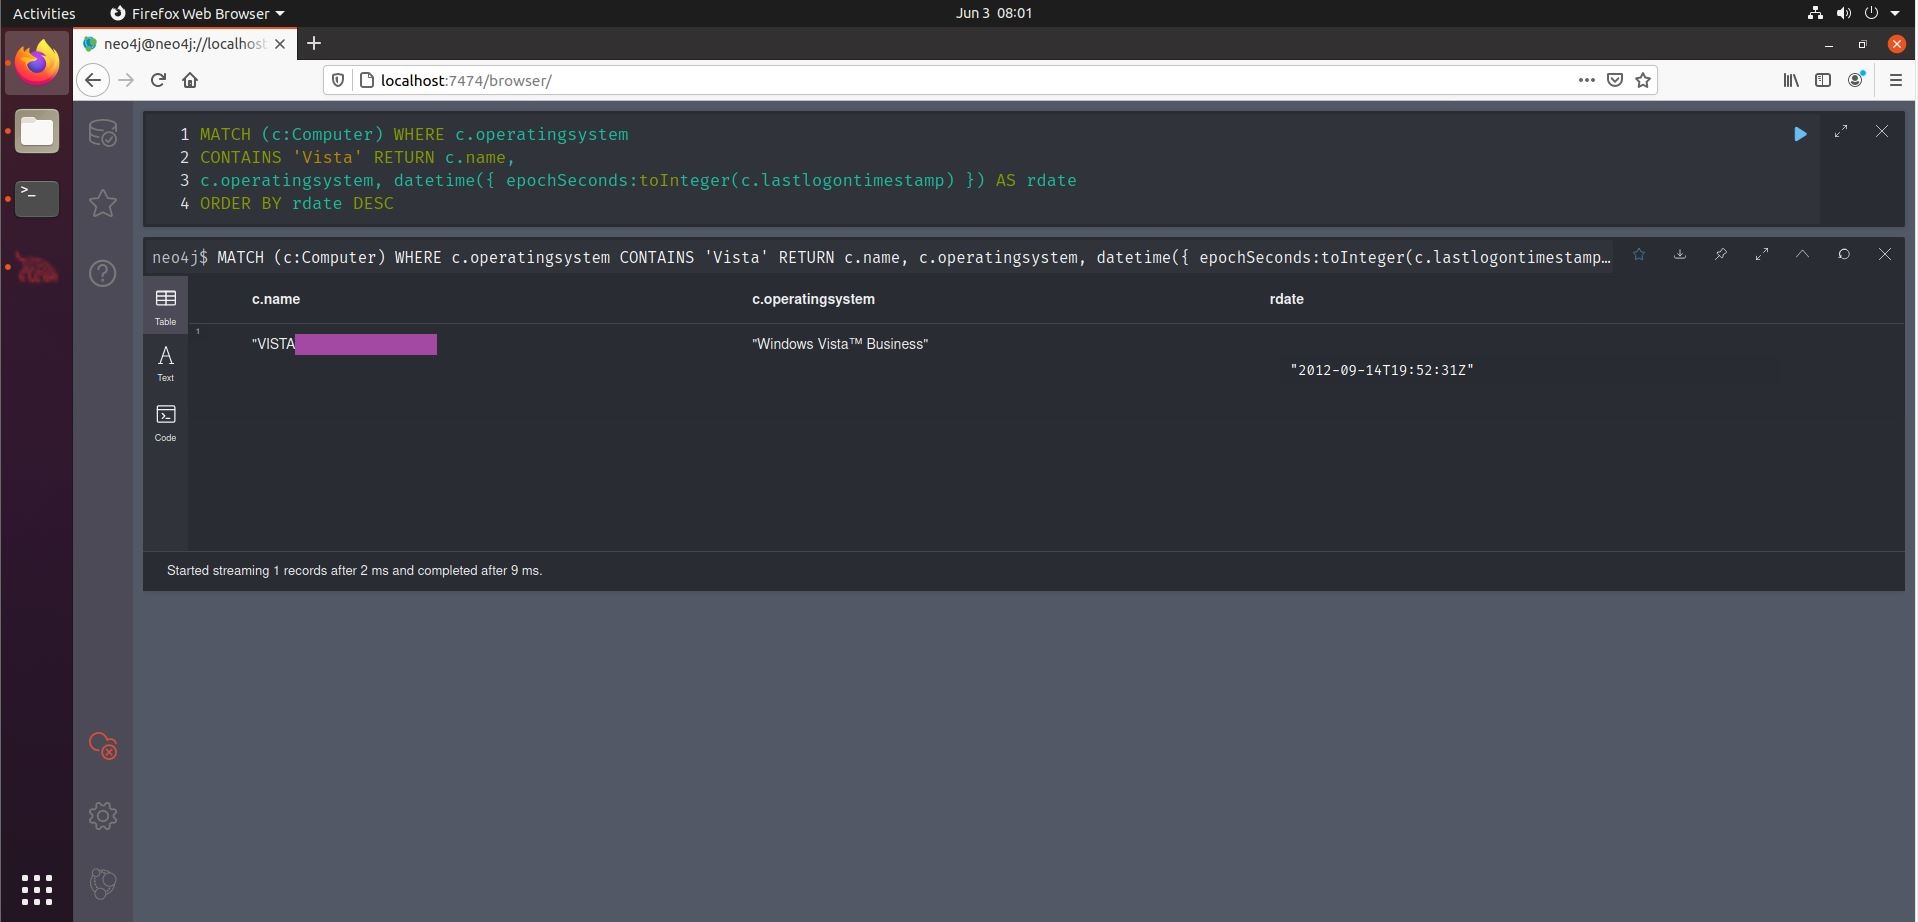
Now, the real fun begins, as we will venture a bit further from the default queries. Let’s start light. Let’s find out if there are any outdated OS’es in use in the environment. Handy information for RCE or LPE hunting. Have a look at the SANS BloodHound Cheat Sheet. We can use the second query of the Computers section.
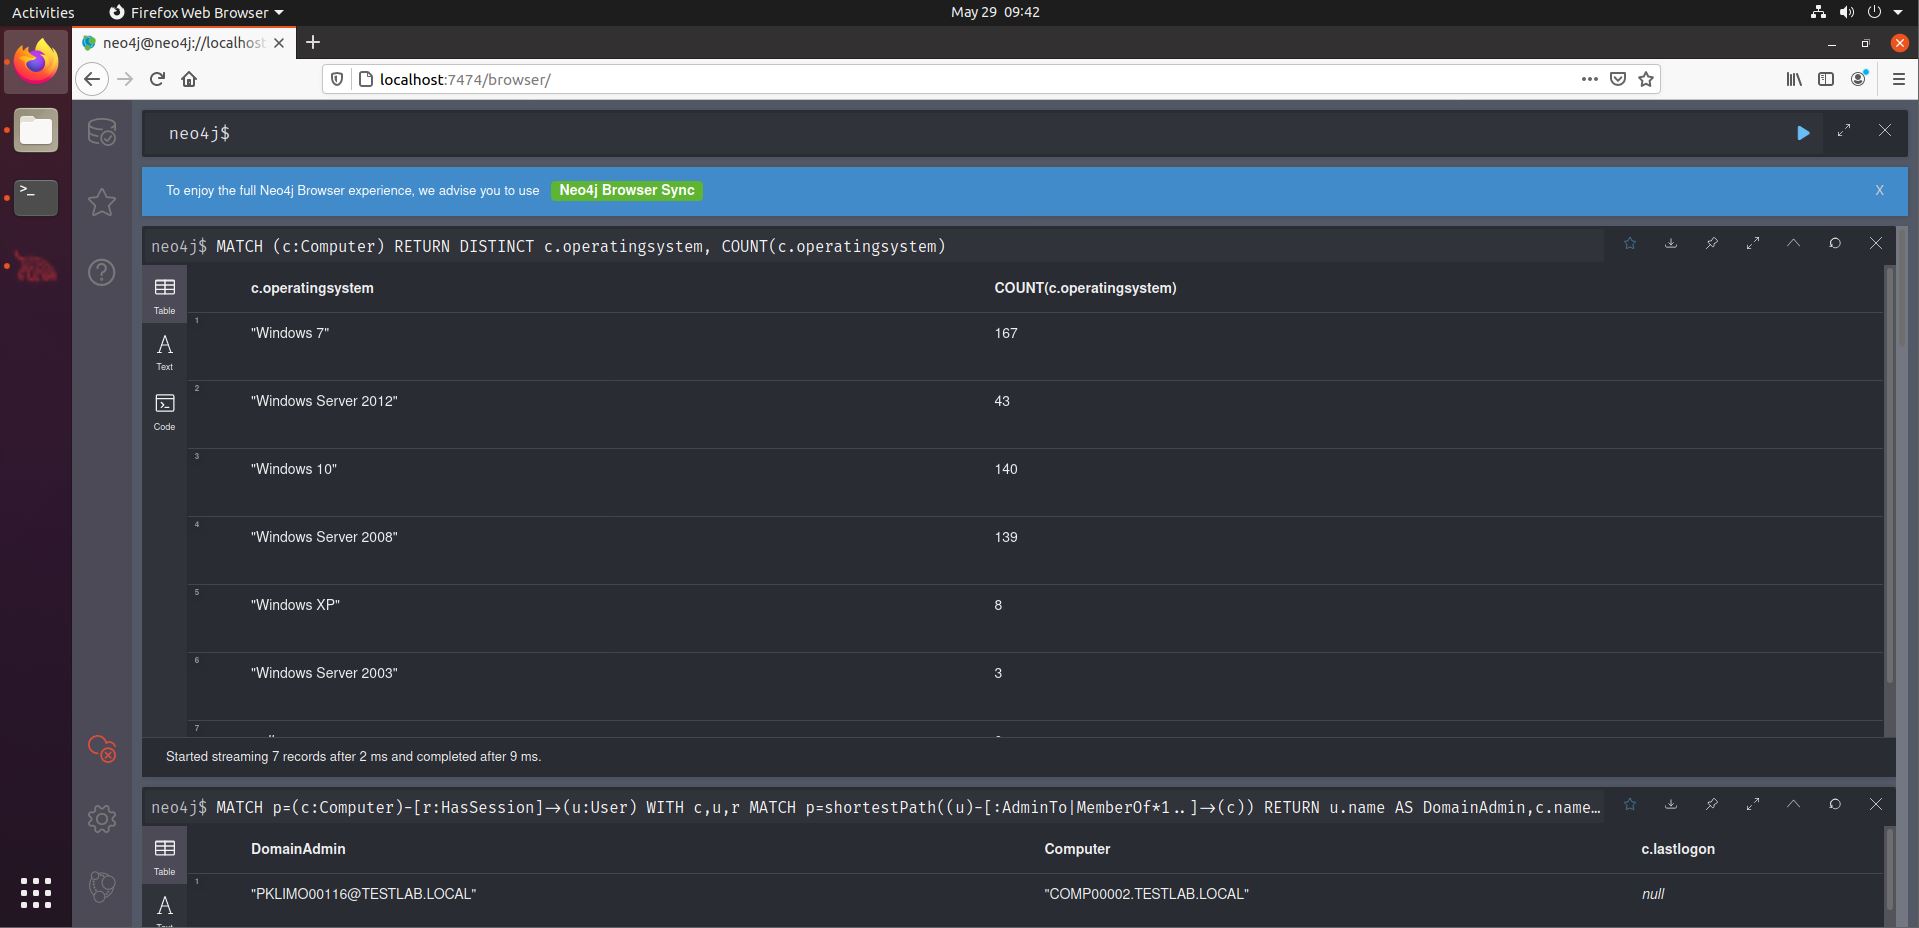
Interestingly, we see that quite a number of OS’es are outdated. Mind you this is based on their name, not what KBs are installed, that kind of information is not stored in AD objects.
There may well be outdated OS’es in your client’s environment, but are they still in use? It is well possible that systems are still in the AD catalog, but have been retired long time ago. One indicator for recent use is the lastlogontimestamp value. Thankfully, we can find this out quite easily with a Neo4j query. The dataset generator from BloodHound-Tools does not include lastlogontimestamp values, so if you’re trying this out, you will not get results from this. However, collected data will contain these values, as shown in the screenshot below, based on data collected in a real environment.
Another interesting query is the one discovering users that have not logged in for 90 (or any arbitrary amount of) days. Say you have write-access to a user group. You may want to reset one of those user’s credentials so you can use their account, effectively achieving lateral movement to that account. But you don’t want to disturb your target environment’s operations, so ideally you would find a user account that was not used recently. This can be achieved (the 90 days threshold) using the fourth query from the middle column of the Cheat Sheet.
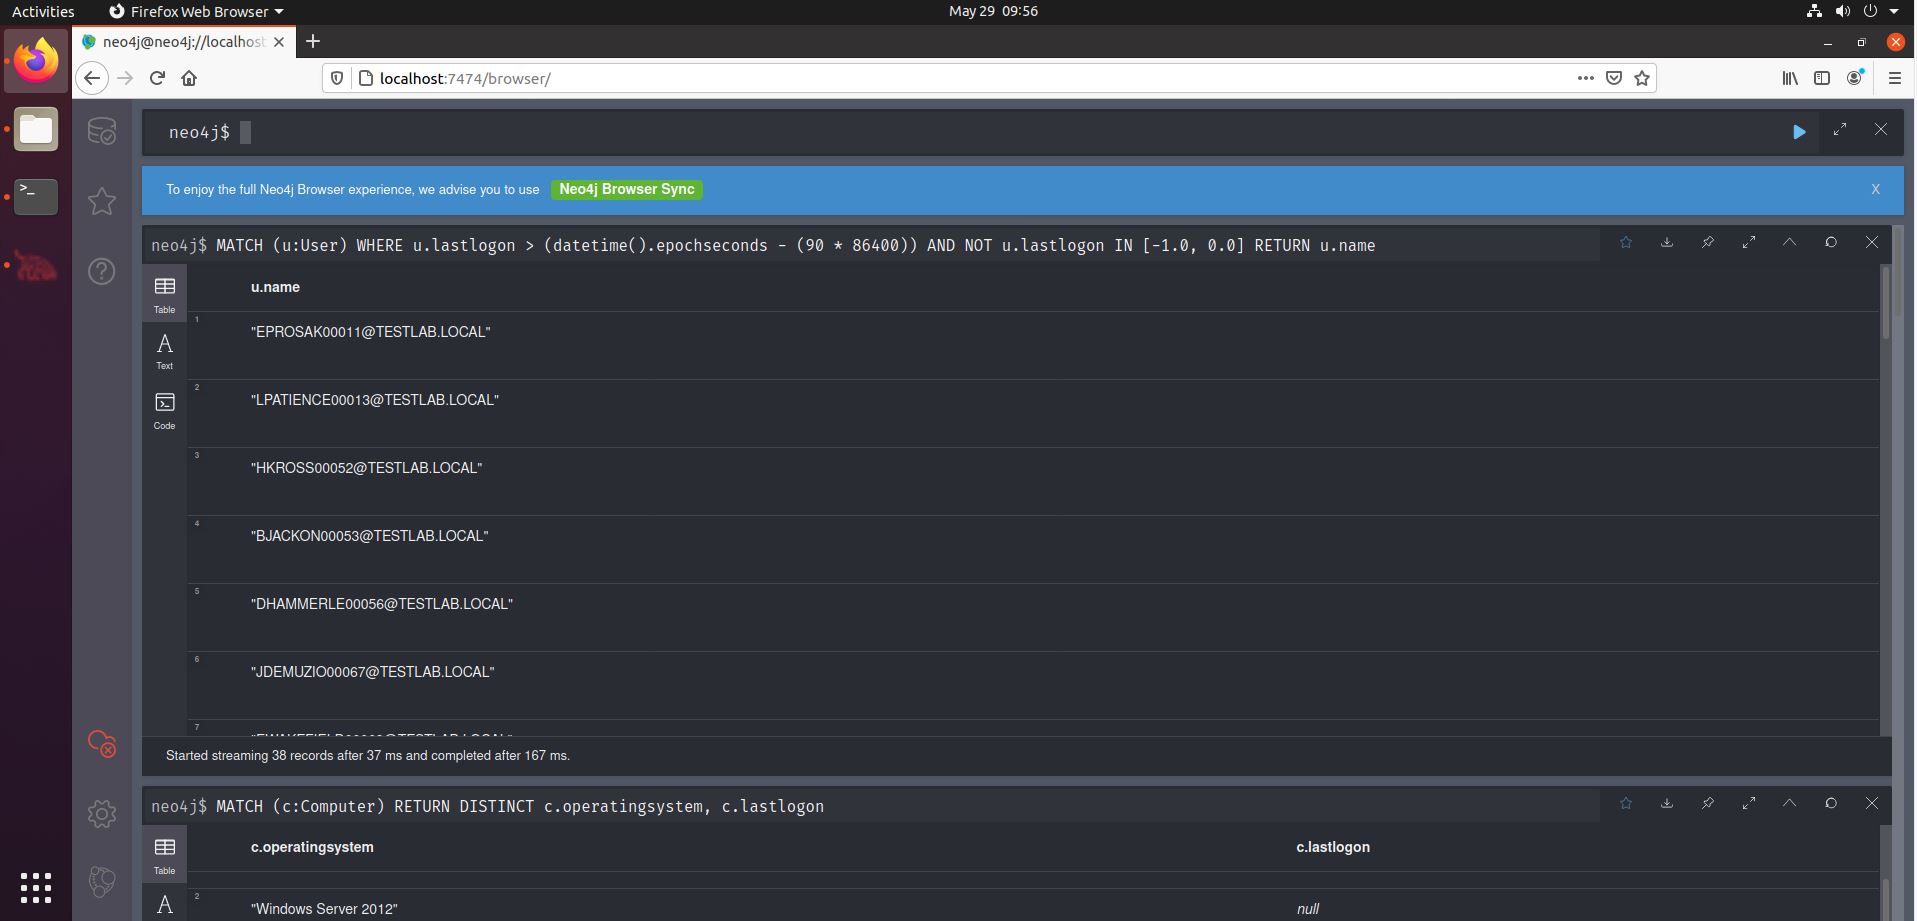
We can see that the query involves some parsing of epochseconds, in order to achieve the 90 day filtering. Another such conversion can be found in the last of the Computers query on the Cheat Sheet, where the results of the query are ordered by lastlogontimestamp, effectively showing (in human readable format) when a computer was lost logged into.
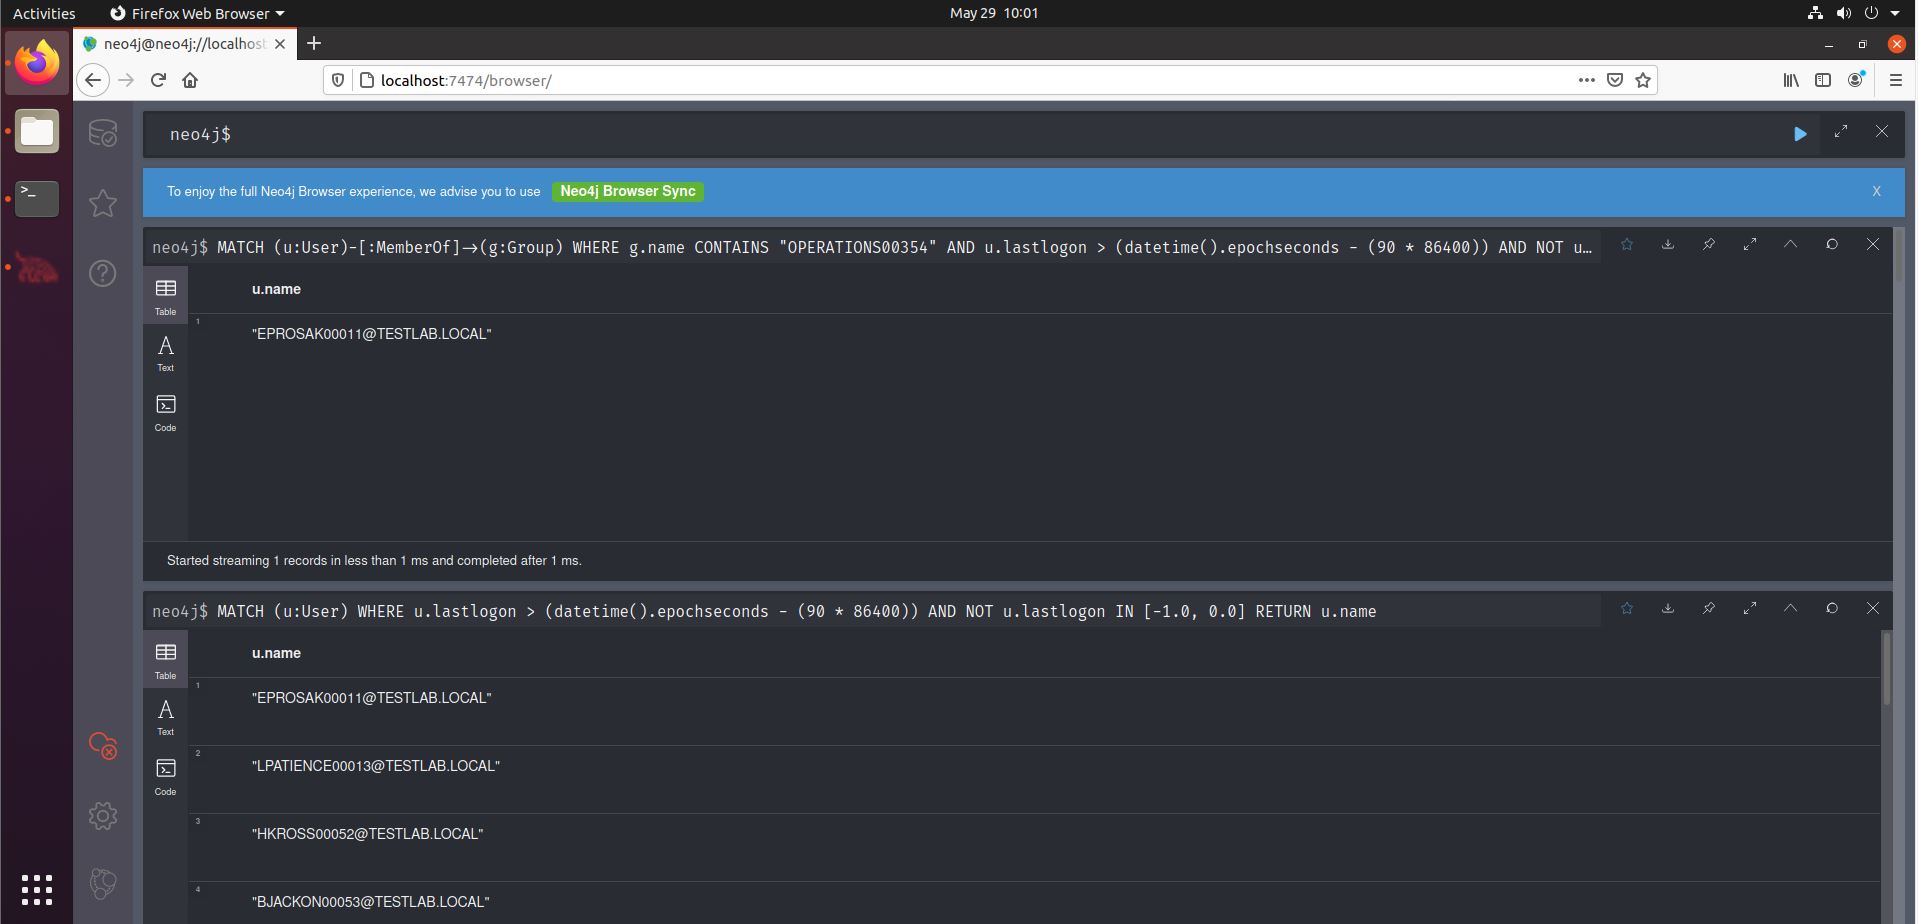
Now what if we want to filter our 90-days-logged-in-query to just show the users that are a member of that particular group? This is the original query:
MATCH (u:User) WHERE u.lastlogon > (datetime().epochseconds - (90 * 86400)) AND NOT u.lastlogon IN [-1.0, 0.0] RETURN u.name
We can adapt it to only take into account users that are member of a specific group. We first describe we want the users that are member of a specific group, and then filter on the lastlogon as done in the original query. The bold parts are the new ones.
MATCH (u:User)-[:MemberOf]->(g:Group) WHERE g.name CONTAINS "OPERATIONS00354" AND u.lastlogon > (datetime().epochseconds - (90 * 86400)) AND NOT u.lastlogon IN [-1.0, 0.0] RETURN u.name
Together with its Neo4j DB and SharpHound collector, BloodHound is a powerful tool for assessing Active Directory environments. The complex intricate relations between AD objects are easily visualized and analyzed with a Red Team mindset in the pre-built queries. An Offensive Operation aiming at conquering an Active Directory Domain is well served with such a great tool to show the way. Whenever the pre-built interface starts to feel like a harness, you can switch to direct queries in the Neo4j DB to find the data and relations you are looking for. The SANS BloodHound Cheat Sheet to help you is in no way exhaustive, but rather it aims at providing the first steps to get going with these tools and make your life easier when writing queries.
Happy DA hunting!
Sources used in the creation of the BloodHound Cheat Sheet are mentioned on the Cheat Sheet
